반응형 출력 (Rective output)
reactive output을 위한 2단계 진행
반응형 출력(reactive output)을 위해서는 2단계로 진행한다.
| Output function | Creates |
|---|---|
| dataTableOutput | DataTable |
| htmlOutput | raw HTML |
| imageOutput | image |
| plotOutput | plot |
| tableOutput | table |
| textOutput | text |
| uiOutput | raw HTML |
| verbatimTextOutput | text |
이 외 HTML 태그나 위젯 등을 추가할 수 있으며, 별도 package(예, https://github.com/daattali/timevis, https://rstudio.github.io/DT/shiny.html)를 사용하여 출력할 수도 있다.
1
2
3
4
5
6
7
8
9
10
11
12
13
14
15
16
17
18
19
20
21
22
23
24
25
26
ui <- page_sidebar(
  title = "censusVis",
  sidebar = sidebar(
    helpText(
      "Create demographic maps with information from the 2010 US Census."
    ),
    selectInput(
      "var",
      label = "Choose a variable to display",
      choices =
        c("Percent White",
          "Percent Black",
          "Percent Hispanic",
          "Percent Asian"),
      selected = "Percent White"
    ),
    sliderInput(
      "range",
      label = "Range of interest:",
      min = 0,
      max = 100,
      value = c(0, 100)
    )
  ),
  textOutput("selected_var")
)
*Output 함수는 인수로 ui 상에 표시될 object 이름을 갖는다. 위 예제에서 textOutput("selected_var") 함수는 문자를 화면에 출력하는 함수이고, ui 부분에 “selected_var”라는 이름을 갖는 object에서 동작한다는 뜻이다.
server function에 UI에서 동작할 코드 작성
ui 부분에 추가된 object가 어떻게 동작할지를 작성해야 한다. 위 예제에서 ui에 배치된 출력은 문자열이고, “selected_bar”라는 이름을 갖는다. server function에서 output$_ojbectname_ 함수를 구현함으로써 ui에서 동작할 내용을 작성할 수 있다.
1
2
3
4
5
6
7
server <- function(input, output) {

  output$selected_var <- renderText({
    "You have selected this"
  })

}
위 예제에서는 단순히 “You have selected this”라는 문자열을 출력하는 것으로 정의하였다. output function과 같이 render function도 처리하고자 하는 내용에 따라 적절한 함수를 사용한다.
| render function | creates |
|---|---|
| renderDataTable | DataTable |
| renderImage | images (saved as a link to a source file) |
| renderPlot | plots |
| renderPrint | any printed output |
| renderTable | data frame, matrix, other table like structures |
| renderText | character strings |
| renderUI | a Shiny tag object or HTML |
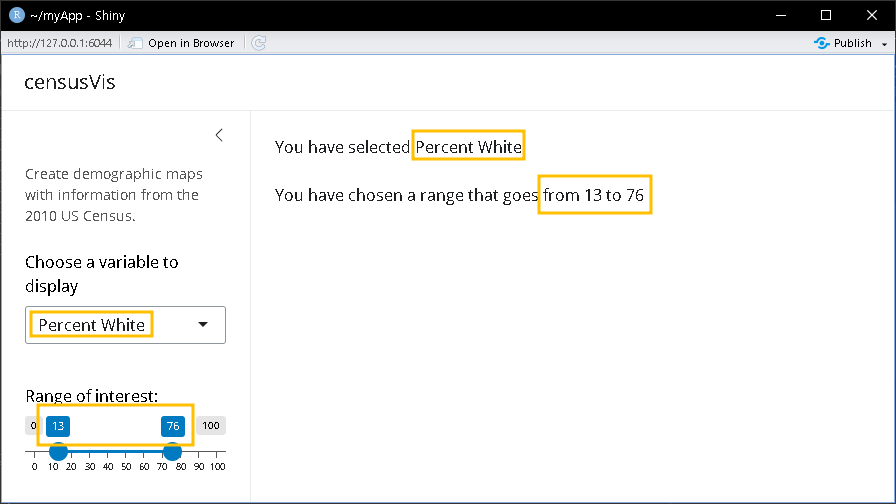
app이 실행될 때 server function 내 함수들이 실행되고, ui에 추가된 object가 변경될 때마다 다시 실행된다. 즉 변경된 object 내용으로 화면을 다시 출력(reactive)하게 된다.
widget 사용
위 예제에서는 server function output$selected_var 함수가 고정된 문자열을 처리하도록 되어 있다. 위젯을 사용한다면 output을 reactive하게 만들 수 있다.
1
2
3
4
5
6
7
server <- function(input, output) {

  output$selected_var <- renderText({
    paste("You have selected", input$var)
  })

}
위 예제는 고정된 문자열에서 사용자 입력에 따른 문자열을 출력하도록 수정되었다. selectInput 위젯 값, 즉 input$var가 변할 때마다 output$selected_var를 호출하게 된다.
1
2
3
4
5
6
7
8
9
10
11
12
13
14
15
16
17
18
19
20
21
22
23
24
25
26
27
28
29
30
31
32
33
34
35
36
37
38
39
40
41
library(shiny)

ui <- page_sidebar(
  title = "censusVis",
  sidebar = sidebar(
    helpText(
      "Create demographic maps with information from the 2010 US Census."
    ),
    selectInput(
      "var",
      label = "Choose a variable to display",
      choices = c("Percent White",
                  "Percent Black",
                  "Percent Hispanic",
                  "Percent Asian"),
      selected = "Percent White"
    ),
    sliderInput(
      "range",
      label = "Range of interest:",
      min = 0, max = 100, value = c(0, 100)
    )
  ),
  textOutput("selected_var"),
  textOutput("min_max")
)

server <- function(input, output) {

  output$selected_var <- renderText({
    paste("You have selected", input$var)
  })

  output$min_max <- renderText({
    paste("You have chosen a range that goes from",
          input$range[1], "to", input$range[2])
  })

}

shinyApp(ui, server)
참고자료
- https://shiny.posit.co/r/getstarted/shiny-basics/lesson4/
_EOF_
